Set up a sensor for the first time to my Dashboard
Setting up your sensors can only be completed via the GlacierGrid mobile app. You can scan the QR code on the sensor (reducing the likelihood of entering an incorrect serial number) or type it in directly on the app.
Creating a location
Before setting up the physical temperature sensors, you will need to set up locations in your GlacierGrid Dashboard. Locations are digital versions of your buildings in the GlacierGrid Dashboard.
Set up your temperature and humidity sensor
GlacierGrid Mobile App:
- Open your GlacierGrid mobile app.
- Click the "+ plus" icon on the top of your screen.
- Select "Add Equipment".

- Select the location or facility that the equipment is located within.
- If you have not configured your location, you will need to do that first.
- Specify the type of equipment that the sensor will be monitoring.
- Options include: Reach-in refrigerator, Reach-in freezer, Walk-in refrigerator, Walk-in freezer, or other.


- Input a name for the equipment that the sensor will be monitoring. For example, "Backroom Freezer #2."
- Scan the QR Code on the front of your sensor.
- You can also manually type in the Serial Number starting with LHT or HT65 instead.

- Activate your sensor by holding down the ACT Button for 5 seconds.

- Input the optional advanced details, such as the current Set Point of your unit, installation date of the unit, dimensions, type, and charge. Do not set the temperature threshold here, you will do it when you create an issue config.
- Clicking "next" will link your sensor to the dashboard.

- If you have more equipment to add to this location, click "Add equipment". If you do not, click "Done"
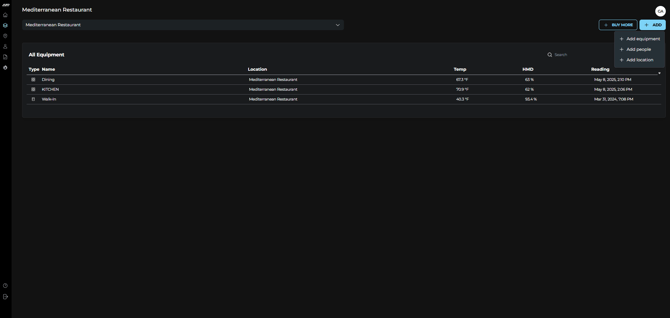
GlacierGrid Web App:
- Navigate to the Equipment screen
- Click the blue Add button and select Add Equipment
- Complete the form:
- Equipment Name
- Equipment Location
- Equipment type
- Device ID
- Equipment Setpoint.
- Click the blue Save button
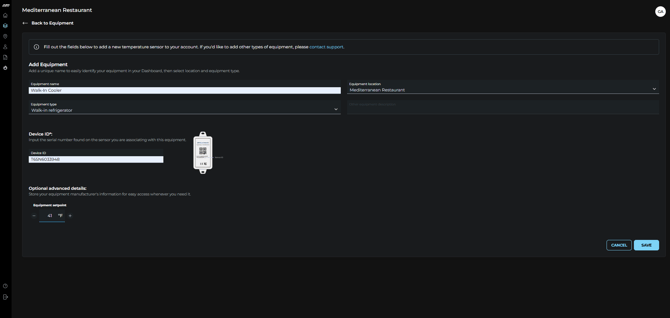
- Activate your sensor by holding down the ACT Button for 5 seconds.
How to Link a Replacement Sensor
Important: The serial number (SN) of a sensor cannot be edited. If you are replacing a sensor, you must remove the old one and add the new one as a separate piece of equipment.
Steps to replace a sensor GlacierGrid Web App:
- Navigate to the Equipment screen.
- Click on the piece of equipment you’d like to replace.
- Delete the old sensor from the equipment:
- Click the trash icon next to the sensor SN.
-
- Confirm that you want to delete the device.

- Add new equipment with the new sensor SN (follow the “Add Equipment” steps above).
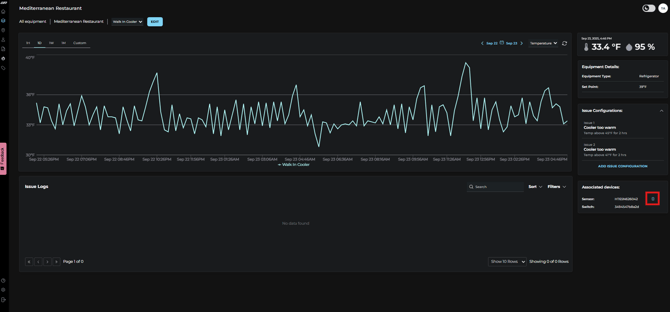
Note: After adding the new equipment, make sure to reconfigure all equipment settings, issues, and alerts for the new sensor, and confirm that it is reporting correctly on your dashboard.
If you need assistance adding sensors to your dashboard, feel free to reach out to our support team at support@glaciergrid.com.
For detailed instructions, you can also check out the article How do I set up and activate my GlacierGrid Refrigeration Monitoring System?.
Now that your dashboard is set up, configure alerts to receive the notification of your choice when your equipment goes outside of your configured temperatures. To learn more about setting up alerts, click here.